


The Triumph of Napoleon’s Triumph
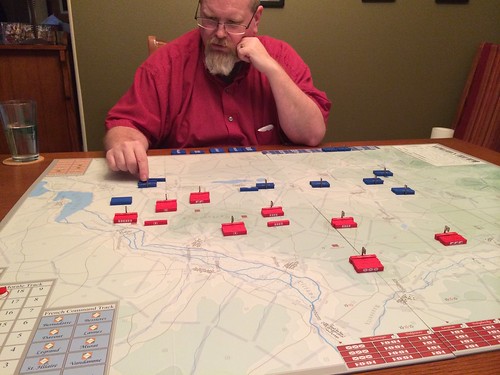
Ken and I continued our play-through of the Bowen Simmons collection of elegantly designed block wargames focused on 19th century battles. We started with his first entry Bonaparte at Marengo and were ready to move onto the successor Napoleon's Triumph depicting the Battle of Austerlitz.
Many of the core mechanisms carry over for this game, but movement and combat are different enough that we did feel like we were playing a very different game. Having only played Napoleon's Triumph once I'm hardly qualified for a detailed explanation of how they are different, but I'll try anyway:
- Marengo feels almost like a two player abstract game. It played like a game of maneuver and not combat. It felt a bit "gamey" at times because there were some road maneuver tricks and sequencing that could really hurt you if you didn't pay very careful attention and think through all of your opponents options. I experienced this first hand when Ken achieved almost a first turn victory because of a simple goof (and a lucky random draw). Artillery had very custom rules for how to engage, which was odd as each side only had one artillery unit and were tough to bring to bear in combat.
- Triumph feels much more like a wargame to me and the combat system is more streamlined and less full of special cases (artillery still behaves differently but at least it is integrated into the normal combat workflow). Triumph, instead of just focusing on maneuver and flanking, also has an element of bluffing in combat and often a need to protract battles of attrition to achieve objectives. There is still no dice rolling in the game, but the selective revealing of lead units on both sides plus the potential for counter-attacks adds tension and risk. It also makes it even more important to keep track (as bet you can) unit types and strengths as blocks are revealed. Triumph also introduced the notion of cohesive corps and leaders which constrains the moves a player can make.
Ken and I played the shorter December 2 scenario with me playing the unsuspecting Allies and Ken playing the ready-to-provoke Napoleon. Each player gets the opportunity to secretly configure their armies with some constraints: each leader goes in a designated locale and must have corps of at least a specified size, but you have a lot of flexibility about what comprises each corps. Additionally, the French get a final setup option to detach and reposition a small number of blocks.
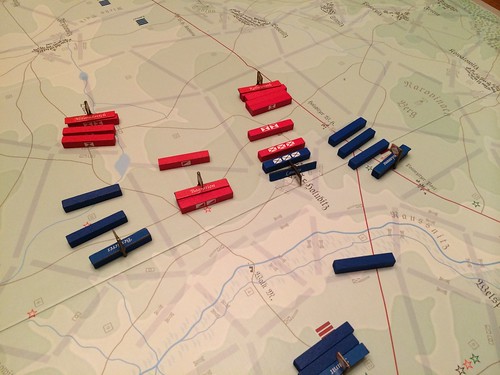
I chose to concentrate my strongest units on the Allied left flank, hoping to push through and capture one or more victory locations. This mean concentrating my strong infantry (minus guard infantry troops - more on that later) sprinkled with a few cavalry on the left. On the Allied right flank I concentrated the rest of my cavalry plus a few weaker infantry to soak up damage. In the middle rear I placed my concentrated guard infantry to keep some flexibility for end game shenanigans.
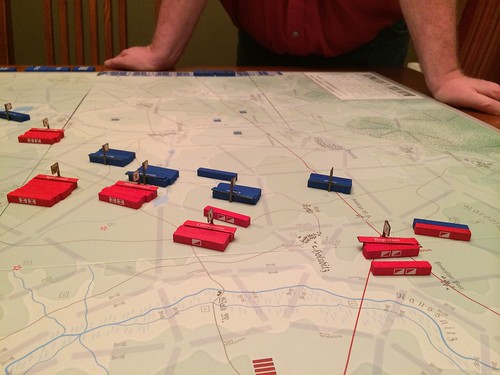
Interestingly, Ken decided to focus his attack on his own left flank (my right) so we had a perfect storm of unbalanced deployments. I began to push hard on my left, and Ken started chasing around my cavalry on my right.
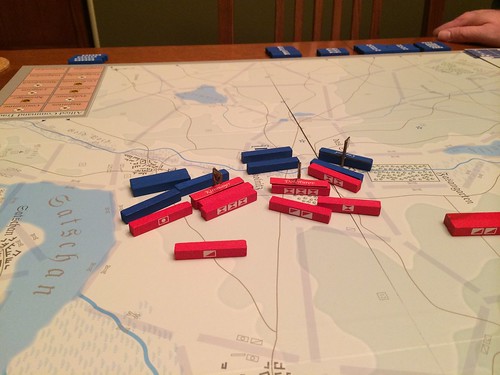
By late morning (5th turn) there has been a lot of bloodshed. The Allies have successfully surrounded Sokolnitz and are eagerly grabbing victory point locales.
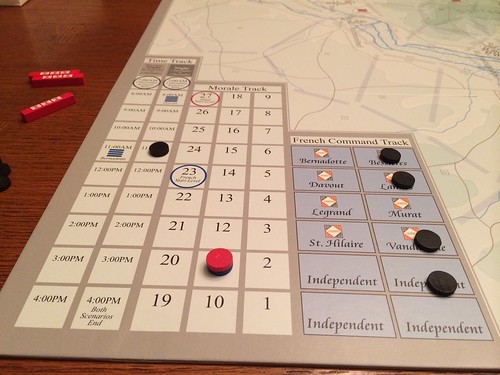
This is a good time to talk about the victory conditions which I think are one of the more creative elements in the design. There are a few ways for each side to win:
- There is a morale track that tracks the morale of each player's army. If this goes to zero, the other side wins a decisive victory. You lose morale (generally) when you lose unit steps in a lost battle or retreat. Additionally, an army will lose morale when it commits and reveals elite units. This encourages players to hold back the best units (like the guard infantry) until they are absolutely needed.
- The French have some optional reinforcements they can bring into the game. If they leave them out, they simply need to keep the Allies from controlling any of their home "starred" locales OR control any one of the Allied home starred locales.
- If the French decide to bring on their reinforcements, the French need to not only keep the Allies out of their home locales, but also control three different objectives (which might be in a single locale but more likely are spread out).
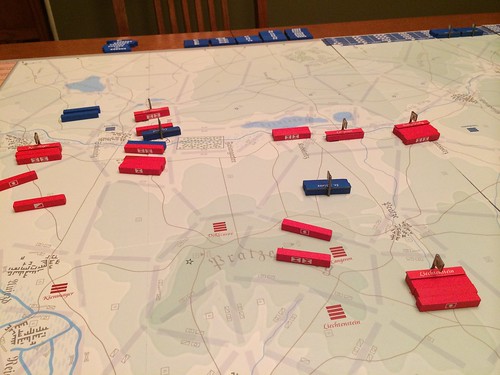
By 11am the French are rapidly advancing and are likely to control key Allied objective in the near future. I'm working around their flank hoping to counter-attack soon. Note that we didn't fully understand the rules for control when we played this game and though we both managed to control objective locales on the board, we likely were not being mindful of tracing a main road path to an entry locale.
We have both been battered on morale and are weighing the relative merits of going for the marginal victory conditions (based on board objective control) vs. decisive victory based on morale. At this point with Ken's decisive push on my right flank I'm thinking that a morale victory is more likely for me. Time to counter-attack and start killing troops!

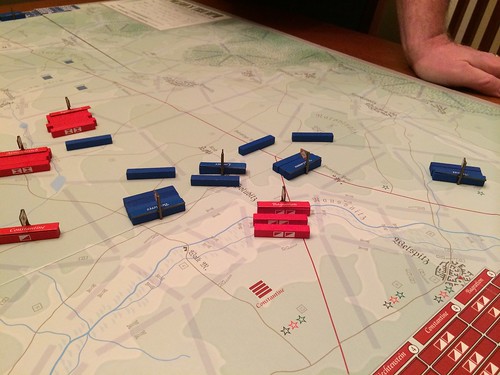
I've almost cleared the board on my left flank and grow tired of chasing on of his last remaining units and decide to stop wasting valuable command actions to go after him. There are riper targets on my right flank.
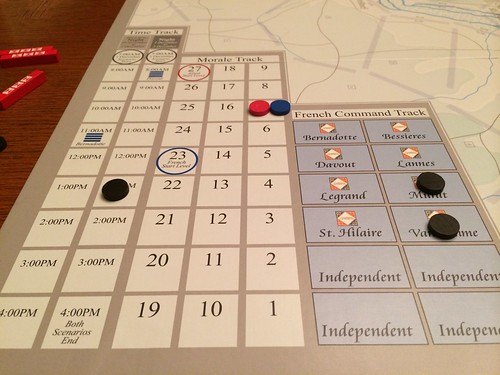
As we head into what will be our last turn, we are both sitting at a morale level of seven. The action as I predicted is all on the Allied right flank as we both gear up to commit our best forces to the battles. This involves both of us revealing our elite infantry and guard units, though we both time this reasonably well as to not cause too much damage. An army cannot go to zero morale (and lose decisively) by revealing an elite unit - the morale just stays pegged at 1.
The battle ended with a decisive morale victory for the Allies (me) and it came down to the final battle. Ken staged multiple attacks into a single locale across two different approaches. If I hadn't consolidated all of my guard infantry units together in the same corps then Ken would have won the game. As it worked out, I had one last hidden guard unit to withstand his final attack, allowing me to win the battle and take his morale to zero.
Ken and I both agreed this was one of the best two-player wargaming experiences we've ever had. This first full play took about 5 hours though I think future plays of the day 2 scenario will only take 3 hours (still longer than the advertised 2 hours). It took time for us to work out the combat rules, how artillery works, retreats, etc. but things were flowing nicely by mid-game. We plan to play this three more times before moving on to The Guns of Gettysburg.